
3D Printing - Cura Infill Settings Explained

When it comes to 3D printing, achieving the perfect balance between strength and material usage is essential. This is where infill settings in Cura slicer come into play. Infill dictates the internal structure of your 3D print, impacting its strength, weight, and overall quality. In this comprehensive guide, we delve into the world of infill settings, shedding light on their significance and how they can be optimized to enhance your 3D prints.
What is Infill?
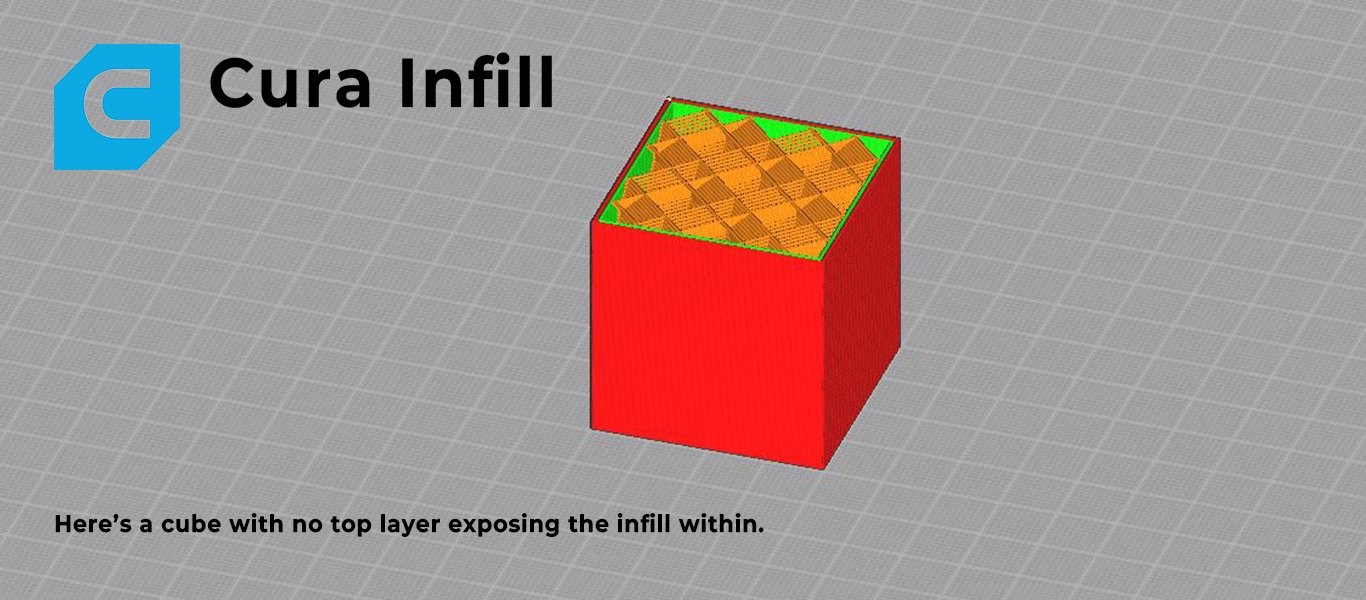
Infill serves as the foundational interior structure of a 3D-printed object, playing a pivotal role in determining its strength, weight, and overall quality. Unlike the outer shell that defines the object's external appearance, infill comprises the lattice-like internal framework that reinforces and supports the design.
At its core, infill density takes center stage in the world of infill settings. This critical parameter defines the volume of material, usually plastic filament, used to fill the inner space of the model. Expressed as a percentage, higher densities indicate a more solid interior. A greater infill density directly contributes to a stronger object, as it offers additional material to withstand mechanical stress and pressure. This makes higher infill densities an ideal choice for functional parts requiring durability and structural integrity.
However, the choice of infill density involves a balance between strength and material conservation. Models created for aesthetic or visual purposes, such as decorative art pieces, may not necessitate such high densities. In such cases, an infill density of around 20% often suffices to maintain a delicate equilibrium between structural robustness and efficient material usage. Conversely, for parts expected to endure mechanical forces, opting for higher infill densities becomes paramount.
Beyond mere density control, slicing software like Cura introduces another dimension of customization through infill line distance. Rather than setting the density percentage, this parameter determines the spacing between each infill line. Closer lines result in denser interiors, while greater distances create a more sparsely filled structure. This nuanced approach empowers creators to precisely tailor infill based on project requirements, providing flexibility in balancing strength and material efficiency. The ability to manipulate infill on both density and line distance fronts further showcases the intricate control 3D printing enthusiasts have over their creations.
This understanding of infill forms the foundation for comprehending how infill settings in slicing programs like Cura impact the structural integrity, material usage, and quality of the final 3D-printed object.

Types of Infill Patterns and Their Benefits
There are 14 different infill patterns in Cura to help add strengthen to your prints. We’ll take a quick look at each one and talk a little about their pros and cons.
1. Grid

The Grid pattern resembles the line pattern but introduces lines in two directions, enhancing its strength along the XY axis. Widely regarded as one of the strongest infills, it's particularly suitable for objects expected to withstand horizontal loads. Its balanced distribution of material provides a reliable foundation for various applications.
2. Lines

The Lines pattern is a minimalist approach, dispensing material in unidirectional lines. While it's not the strongest infill, it's efficient for decorative and visually appealing projects. Its unique layering technique results in alternating unidirectional lines, offering simplicity and reduced material usage.
3. Triangles

Ditching the standard grids, the Triangle infill relies on triangular shapes. Its strength is particularly evident in horizontal directions, though intersecting points might slightly interrupt the flow. Choosing this pattern for your prints can deliver a robust and efficient internal structure.
4. Tri-Hexagon

The Tri-Hexagonal pattern takes the traditional triangle infill and adds a twist – the lines are slightly offset. This leads to a combination of small triangles and hexagons, enhancing the overall strength of the infill. With increased horizontal force resistance, the Tri-Hexagonal infill is a prime choice for parts that require robustness.
5. Cubic

The Cubic pattern boasts 3D cubes placed in corners, enhancing strength from multiple angles. Its unique orientation minimizes overhangs and ensures impressive overall strength. Despite its slight weakness in tensile strength, it remains an excellent all-purpose choice.
6. Cubic Subdivision

Cubic Subdivision stands as a smart variant of the cubic pattern, focusing on material efficiency without compromising strength. Its algorithmically designed cubic arrangement minimizes material usage while maintaining print speed and overall structural integrity.
7. Octet

Octet infill combines tetrahedrons and cubes to create a robust internal frame. Ideal for thin mechanical parts, this pattern excels in providing strength across various axes. However, its intricate structure might affect surface quality.
8. Quarter Cubic

The Quarter Cubic infill employs tetrahedrons and truncated tetrahedrons to distribute load uniformly. This pattern suits thin parts demanding significant strength. While surface quality may vary due to bridging distance, its structural benefits are noteworthy.
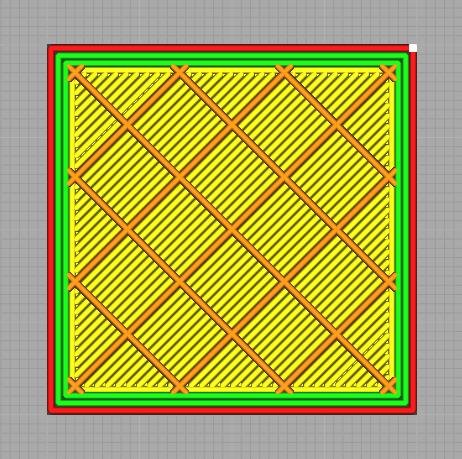
9. Concentric

The Concentric pattern features rings that align with the shape of outer walls. At low densities, it's ideal for flexible parts, gaining rigidity as density increases. At 100% infill, its evenly distributed lines contribute to printing the strongest possible structures.
10. Zig Zag

Similar to the Lines pattern, Zig-Zag uses continuous lines that avoid starting anew at each outer wall. Faster but slightly weaker, Zig-Zag is suitable for decorative projects. It also minimizes filament oozing, contributing to cleaner prints.
11. Cross

Cubic Subdivision stands as a smart variant of the cubic pattern, focusing on material efficiency without compromising strength. Its algorithmically designed cubic arrangement minimizes material usage while maintaining print speed and overall structural integrity.
12. Cross 3D

Taking the Cross pattern into the third dimension, Cross 3D offers flexibility ideal for thin, flexible parts. Its minimal retraction prevents filament oozing, but it's not suitable for applications requiring high strength.
13. Gyroid

Gyroid infill stands out for its intricate wavy lines that offer strength in all directions. Its aesthetic appeal, especially visible with transparent filaments, adds a touch of elegance to your prints. While its complexity can result in longer slicing times, the Gyroid pattern is a go-to option for both structural integrity and visual appeal.
14. Lightning

Cura's Lightening infill, introduced in version 4.12, focuses on efficiency and reducing material usage. It creates an internal support structure in challenging areas, while reducing infill where not essential. Although requiring experience, Lightening offers a balance between material conservation and print quality.
Best Infill Patterns
With an array of infill patterns at your disposal in Cura, selecting the right one can significantly impact your 3D printed object's strength, speed, and material efficiency. Let's explore some of the best infill patterns based on specific criteria:
1. Fastest Printing: Zig-Zag Infill

When speed is of the essence, the Zig-Zag infill pattern takes the lead. Due to its continuous lines that eliminate the need for nozzle retractions and filament traverses, Zig-Zag cuts down on printing time. This makes it an ideal choice for projects that prioritize quick production without compromising overall quality.
2. Optimal Strength: Tri-Hexagonal Infill

For 3D prints requiring maximum structural integrity, the Tri-Hexagonal infill pattern shines. Its combination of triangles and hexagons offers exceptional strength in multiple directions, making it a standout performer in scenarios demanding robustness and durability.
3. Minimum Material Usage: Cross Infill

When conserving material is essential, the Cross infill pattern comes to the forefront. With its deliberate avoidance of long, straight horizontal lines, Cross infill minimizes material consumption while maintaining an effective internal structure. This choice is ideal for reducing print costs and waste.
4. Even Load Distribution: Grid Infill
When load distribution is a priority, the Grid infill pattern excels. Its dual-directional lines offer strength along both the X and Y axes, making it a reliable option for applications requiring consistent and balanced support, especially in scenarios involving horizontal forces.
5. Visual Aesthetics: Gyroid Infill

If aesthetics are a concern, the Gyroid infill pattern delivers both visual appeal and structural integrity. Its wavy lines offer an elegant internal geometry, particularly visible with transparent filaments. Despite potentially longer slicing times, the Gyroid infill adds an artistic touch to your prints.
6. Flexibility and Balance: Concentric Infill

When seeking a balance between flexibility and strength, the Concentric infill pattern excels. At lower densities, it's ideal for flexible parts, while higher infill percentages yield rigidity. This pattern's versatility makes it suitable for a wide range of applications, striking a balance between strength and adaptability.
Exploring Other Infill Settings
Beyond choosing an infill pattern, Cura offers a range of additional settings to fine-tune your 3D prints. Let's delve into some of these settings and understand their impact on your print quality:
Infill Line Directions - The default setting for infill lines is usually at a 45° angle. This angle maximizes the synergy between the X- and Y-motors, allowing for efficient acceleration and jerk without compromising quality. However, Cura permits you to alter this angle. For instance, you can set it to 0° for vertical or 90° for horizontal lines, yielding distinct top and bottom patterns.
Infill XY Offset - To reposition the infill pattern within your model, you can adjust the infill XY offset. This setting allows you to move the pattern vertically, horizontally, left, or right by inputting an appropriate X or Y offset value. A positive value shifts it up and right, while a negative value shifts it down or left. Notably, this setting doesn't apply to concentric infill patterns.
Infill Overlap Percentage - Control the overlap between the infill and walls using the infill overlap percentage. Higher values promote better bonding between these components, enhancing print strength. However, excessively high values might lead to over-extrusion, potentially affecting visual quality. Generally, Cura's default value proves sufficient for most prints.
Skin Overlap (Percentage) - Similar to infill overlap, the skin overlap influences the connection between the top and bottom layers. By adjusting this setting, you can determine how much the skin overlaps with the underlying structure, potentially enhancing overall print strength and stability.
Infill Wipe Distance - The infill wipe distance controls the point at which the printer stops extruding filament after the infill before transitioning to printing the walls. This prevents over-extrusion on the shell. Though some filament ooze might still occur due to nozzle pressure, the extrusion halt aids in maintaining a cleaner print.
Infill Layer Thickness - Infill layer thickness, distinct from visual layer height, doesn't affect print aesthetics. This setting enables thicker infill layers than the standard layer height, allowing for reduced print times while maintaining structural integrity. Ensure the infill layer thickness aligns with multiples of the layer height to avoid rounding issues.
Gradual Infill Steps - For enhanced efficiency, the gradual infill step setting reduces infill in lower layers, while maintaining density in upper layers. This feature optimizes print time while ensuring critical top layers remain adequately filled.
Gradual Infill Step Height - Gradual infill step height dictates the level at which infill density reduction begins. By adjusting this parameter, you can effectively close the top layers without excess infill, achieving a seamless outer finish.
Infill Before Walls - This setting reverses the printing sequence, making the printer lay down infill before walls. While this can improve overhangs by providing a base for the walls, it might lead to infill visibility through the walls, potentially affecting surface smoothness.
Minimum Infill Area - Selective application of skin instead of infill is achievable through the minimum infill area setting. This setting permits small areas on a single layer to be solidly printed, enhancing strength where needed.
Skin Removal and Skin Expansion - In models requiring specific internal geometries, skin removal and expansion settings come in handy. By expanding or removing the skin where infill would typically be present, you can achieve better adhesion between protruding elements and the rest of the model, enhancing overall strength.
Skin Removal Width and Skin Expand Distance - Fine-tune skin removal and expansion by specifying the width and distance parameters. These settings influence the degree of change in skin geometry, affecting strength and weight distribution.
Maximum Skin Angle for Expansion and Minimum Skin Width for Expansion - These settings allow selective expansion of the skin in specific areas. By designating an angle, you can strengthen certain zones without affecting the rest of the model. For instance, a horizontal angle could bolster flat surfaces with protruding elements.
Navigating these intricate settings within Cura empowers you to produce prints with precision, strength, and optimized efficiency. By tailoring these parameters to your project's specific requirements, you can harness the full potential of your 3D printer and achieve exceptional results.

Print Time Savings
Adding strength to a model is important but so is keeping the print time to an absolute minimum. This is especially important if you are running a print farm where all those extra minutes add up.
I recommend playing around with a few different infill patterns when slicing a print job to see how they affect the print time. On a big print, choosing the right pattern could save hours of printing time.
Here’s an example using a bust of Albert Einstein:


As you can see by these results, the print time varies depending on the infill pattern. Once you have found the infill pattern that fits your needs and saves you time, just save that infill pattern to your print profile and use it next print.
Remember, print time isn’t as important as strength. Plan your infill pattern and percentage to meet your strength and durability needs first and then go for time savings after.
My Recommendations
Here are a few more tips to help you better understand infill:
Increasing the Number of Walls: Adding more walls significantly enhances the strength of the part, more efficiently than simply increasing the infill density.
Shell Thickness over Infill Density: Increasing the shell thickness (number of perimeters, wall thickness, etc.) had a much more substantial impact on strength compared to just varying the infill density.
Avoiding 100% Infill: Using a 100% infill ratio might not be economically feasible and can lead to printing issues. The material in the core mostly doesn't contribute significantly to strength.
Standard Recommendations: For parts that require strength, a good compromise may be around 4 walls and 50% infill, using patterns like Gyroid, which provides a dense grid even at low infill ratios. The average part should be good with 1.6mm of wall (4 walls x 0.4mm line width)
Single Wall Parts: I would avoid printing parts with a single wall due to the fact that the infill pattern will show through the material.
Top Layer Over Infill: One thing to keep in mind is how the infill % will affect your top layer quality. If you’re using a low %, there will be big gaps in between your infill lines and the top layer will have to basically bridge over them which can cause your filament to sag. This will leave a pattern on the top of your print and will definitely ruin the surface quality. As of the time of writing this, I’m not aware of any setting to battle this. You can lower your top print speed but this could add a lot of print time if it’s a big part. I recommend adding another top layer or 2 which usually covers up this bridging and can restore the surface quality.
Print Speed: Infill speed should be the highest print speed of your print since no one will ever see it. Save yourself a lot of time by cranking up the speed and acceleration for infill.
Understanding infill settings is a gateway to achieving prints that perfectly balance strength, weight, and quality. By exploring the intricacies of infill density, line patterns, and other related settings, you can elevate your 3D printing projects to new heights. Whether you're crafting functional prototypes or intricate artistic creations, harnessing the power of infill customization will undoubtedly lead you to more successful and impressive prints.
Trending Articles


Latest Articles


Get an in-depth look at the QIDI Tech Q1 Pro in our detailed review. Find out how this desktop 3D printer delivers engineering-grade filament printing with unmatched precision, speed, and versatility.