
3D Printing - CPAP Fan Wiring & Config Guide
In this guide, I’ll be going over what a CPAP fan is, the benefits of using one on your 3D printer, how to mount and install it, as well as how to configure it. The majority of this information will be useful for everyone, no matter the hardware and firmware that you are using. However, I will be focusing on how to wire up to a Duet mainboard and how to configure it in RRF. I’ve included a guide for setting up the fan in Klipper but I will not be providing wiring information for specific boards as there are so many. I’ve included the basics for wiring so you should be able to apply these to the board you have.
What is a CPAP Fan?
A CPAP (Continuous Positive Airway Pressure) fan is a key component of a CPAP machine, a medical device used to treat sleep apnea. This fan is designed to draw in ambient air, pressurize it, and deliver a steady stream of this air to the user, helping to keep their airway open during sleep. The CPAP fan is typically compact, operates quietly, and provides consistent and reliable performance.
It is designed to run continuously for long periods of time at high speed. It does this through the use of brushless type motors that help reduce noise and increase reliability.
The biggest difference between a CPAP fan and the more common axial fan is the process of pressuring the airflow through a process known as dynamic compression. When the fan starts, it draws in air through an air intake vent. As the fan blades rotate at high speeds, they create a difference in air pressure. This process is much like how an airplane wing generates lift. The side of the fan blade moving in the same direction as the airflow (the downwind side) moves faster relative to the air it's pushing against, which decreases the air pressure on that side of the blade. Conversely, the upwind side of the fan blade moves slower relative to the oncoming air, which increases the air pressure on that side. This difference in pressure is what propels the air forward and causes it to become pressurized.


Benefits Of Using One On Your 3D Printer
There are 2 main benefits of using a CPAP fan on your 3D printer:
Airflow - If you read the previous section, you should be able to see why a CPAP fan is superior to the more common axial fan when it comes to airflow. It’s able to move a ton of air and is built to withstand continuous operation. You might be wondering if you need all that airflow so let me answer this for you: yes you do. The faster you print, the faster you have to cool. This is even more important when using wider nozzles and thicker layer heights. When you increase your volumetric flow rate, you have to increase your cooling. More airflow ensures that each layer has hardened before you extrude another layer on top. This helps improve the dimensional accuracy and quality of your prints while shortening your printing times.
Weight Saving - Using a CPAP fan is also known as ‘Remote Cooling’. Instead of being mounted right on the printhead like an axial fan, the CPAP fan is mounted to the back of the printer and uses a hose to route the airflow to the part-cooling fan ducts. This lowers the weight of the printhead while slimming down its dimensions. Lower weight = higher printing speeds. Isn’t that the goal?

Where To Buy?
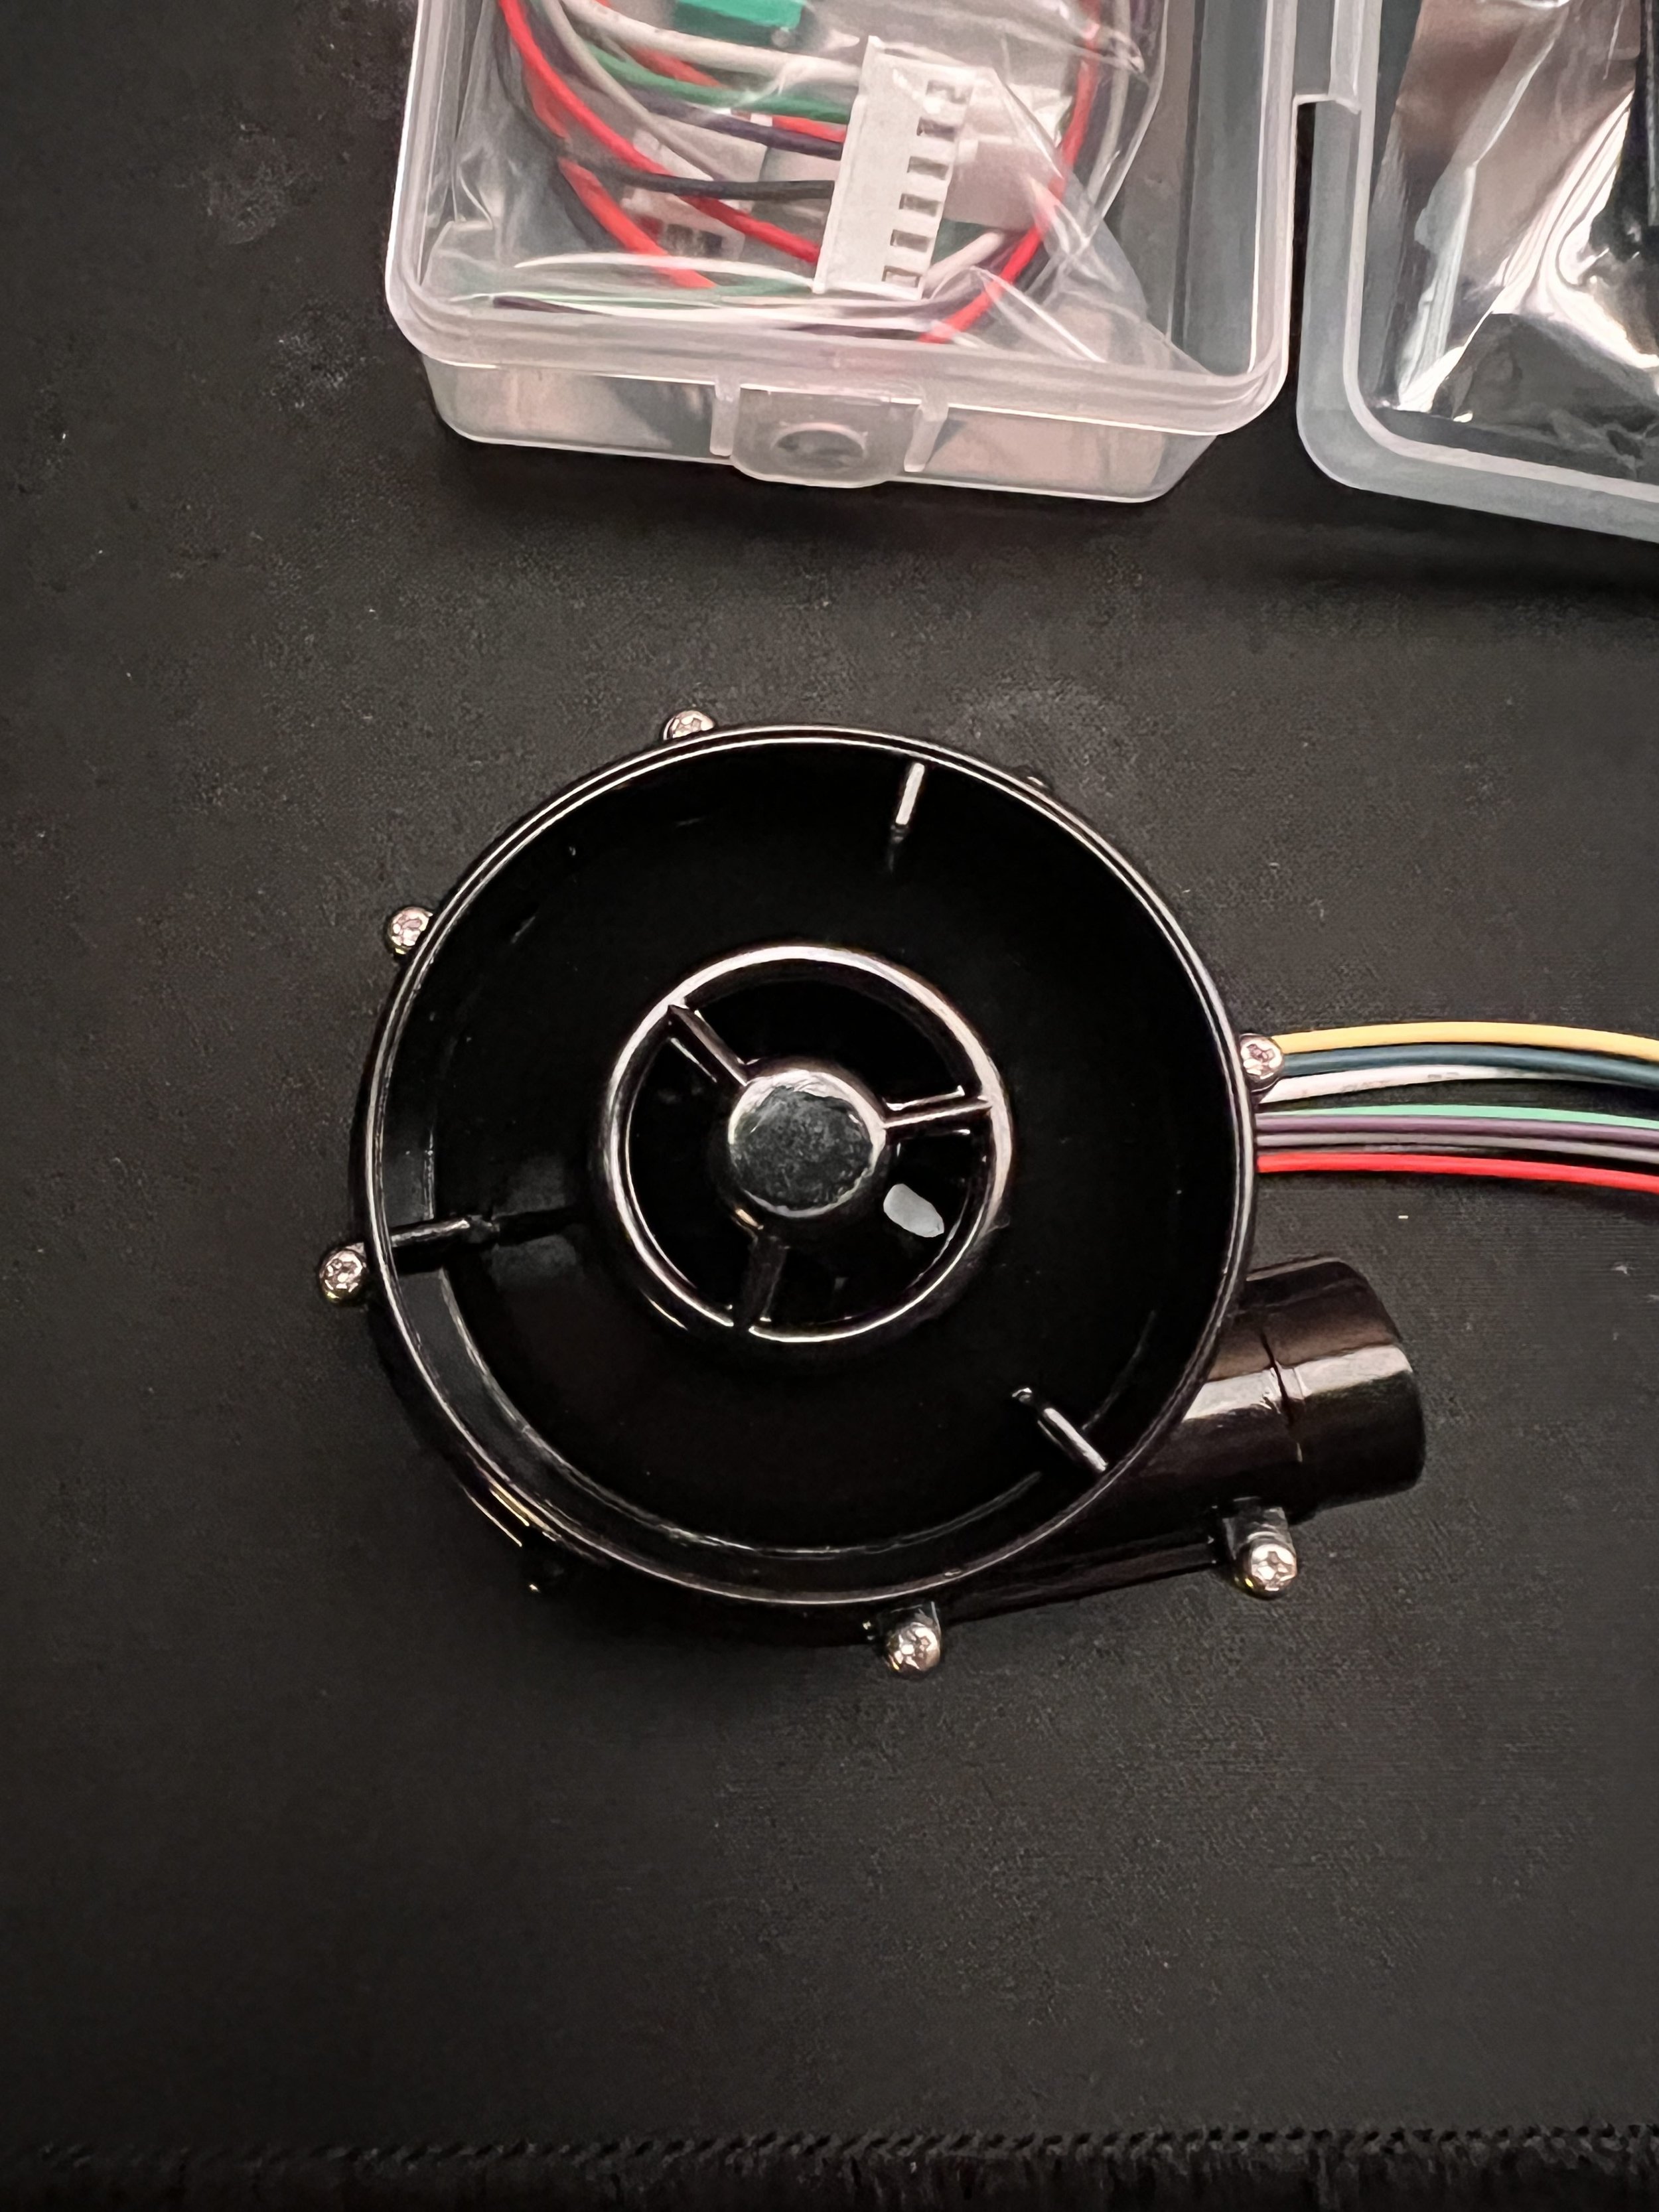
I bought my CPAP fan from the Mellow 3D Official Store on Aliexpress. Mellow is about the only 3D printing supplier on Aliexpress that I trust, they make a lot of great products like the Goliath hotend, and Vz-Hextrudort.
Their CPAP fan is a 24v version so it should work with the majority of 3D printers out there. It’s at a decent price and comes with driver board and a potentiometer if you want the option of controlling it manually.


You’ll also need to buy a CPAP tube as this is what routes the air from the fan to the hotend. These are a bit more accessible but I recommend buying it together with the CPAP fan from Mellow 3D.


Mounting
When mounting, you have to think about how you will mount the fan, how you will route the hose, how you will mount the driver board and the fan duct that you will use.
For the fan, there are simple mounting options, like the one from VzBoT, or a more complex approach as I’ve designed for my printer. You should be able to do a search on a site like Printables and find a few options that will suit your needs.
For routing, having the CPAP tube tag along with your printhead wires is usually the best solution. As long as the printhead isn’t being restricted and is able to reach all corners of the bed.
Now for the part-cooling ducts…this might be more difficult to find depending on the hotend setup that you have. If you are using EVA3 then you are in luck, I have an EVA3 CPAP duct up on my Printables profile that you can download and print. For the less common hotend setups, you may be able to find one or you might be forced to make, or at least remix your own.
The driver board, which is basically the fan’s brain, has to be mounted as well. This should ideally be mounted close to your mainboard as this is what it will have to be connected to.
Wiring Basics
There are 2 basic steps for wiring up your CPAP fan that you can apply to any 3D printer:
Power - Before you connect, you must make sure that the voltage on CPAP fan matches the voltage on your 3D printer. My CPAP fan is 24v as is my 3D printer so they can both be connected together without worry. You must simply connect the fan directly to your 3D printer’s power supply. Be aware that at full load, a CPAP fan could draw 2-3 amps so make sure your printer’s PSU can handle this.
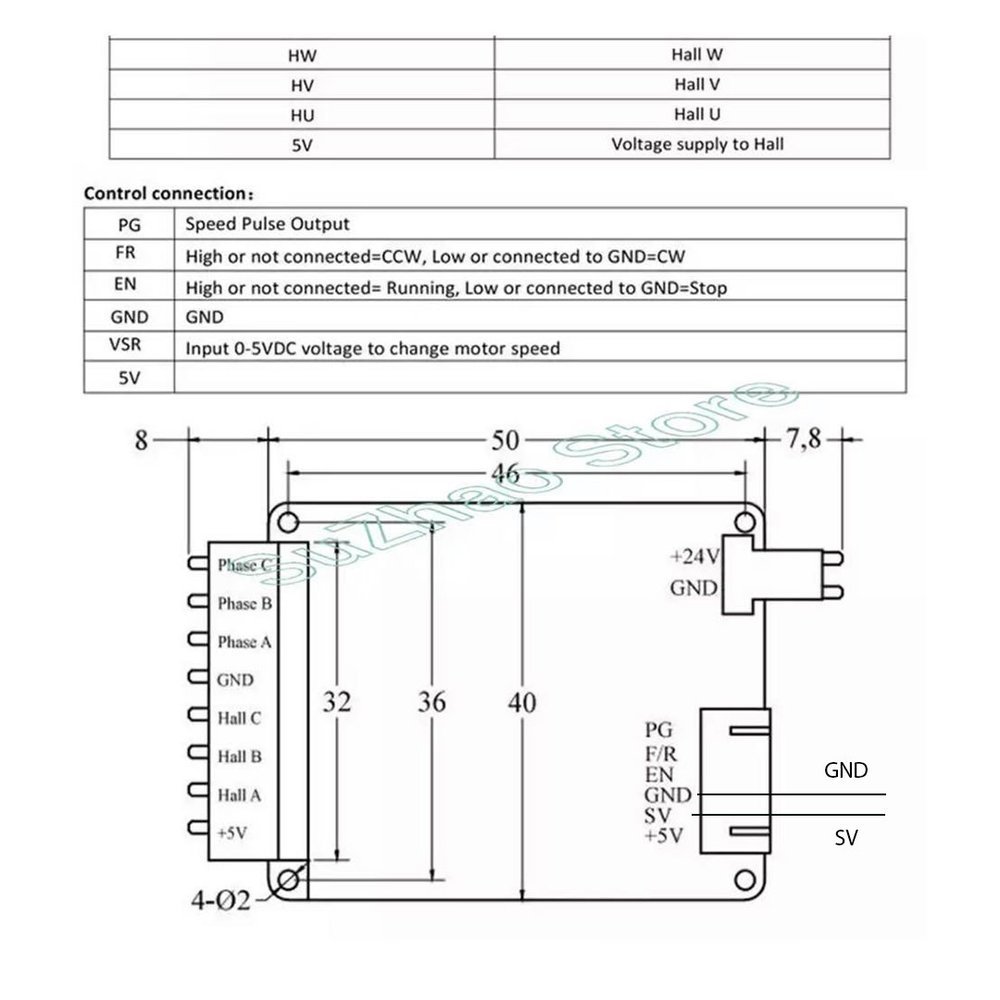
Signal - The CPAP driver board requires a 2v-5v signal to be controlled. You can either connect the board directly to one of the 5v fan ports on your printer’s mainboard or if you’re running Klipper on a Raspberry Pi (or similar SBC), you can connect it to one of the GPIO pins. Make sure the fan port you are using has PWM (Pulse Width Modulation). Most newer printer mainboards will have fan ports with a jumper that lets you select either a 5v/12/24v output. I advise you take a lot of caution when using these ports, if you set the jumper incorrectly or connect to the wrong port you could potentially send a high voltage to the driver board which would

Wiring Duet 3 Mini 5+
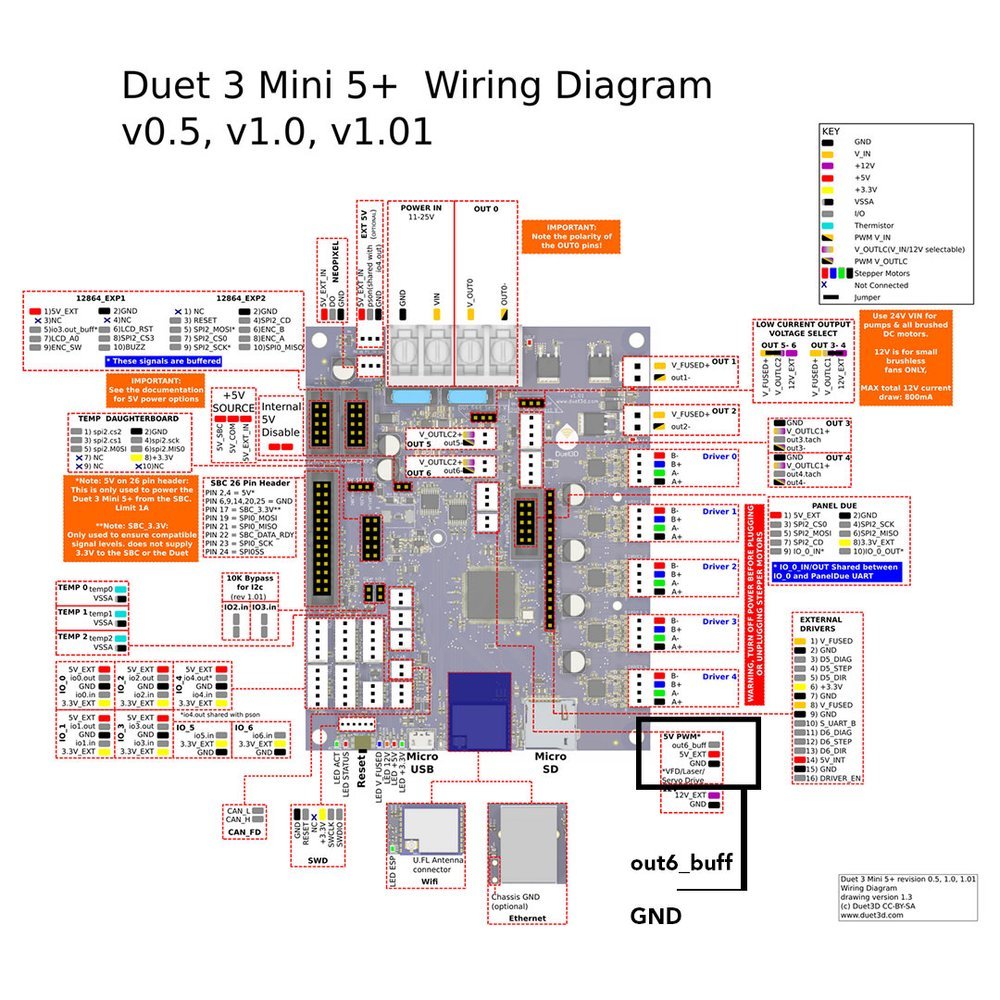
Here’s how to wire up a CPAP fan to your Duet 3 Mini 5+.
Power - Wire a 24V and Ground from your 3D printers 24v power supply to the fans driver board. My CPAP fan came with a power plug with a small section of wire that I extended in order to reach my PSU.
Signal/GND - I am using the ‘out6_buff’ for signal and ground. It’s a 5v output with PWM. Connect ‘out6_buff’ to ‘SV’ on the driver board and then “GND’ to ‘GND’.
That’s all you’ll need to do to connect to your Duet 3.
Wiring Raspberry Pi
Wiring to a Raspberry Pi is super simple as well.
1) Connect 24v positive and ground from your printers PSU into the CPAP driver board.
2) Choose a GPIO pin on your Raspberry Pi and connect it to ‘SV’ on the CPAP driver board. You’ll need to remember which GPIO pin number you are using so you can call it in Klipper.

Wiring To Mainboard
Here’s how to wire up a CPAP fan to pretty much any other mainboard.
Power - Wire a 24V and Ground from your 3D printer’s 24V power supply to the fan’s driver board.
Signal - Choose any 5v output with PWM on your mainboard and connect it to ‘SV’ on the CPAP driver board.
That’s all you’ll need to do. The CPAP fan just needs power and a single 5V PWM signal to be controlled.


Firmware Configuration - RRF
Setting this up in your firmware is very easy if your printer is already up and running.
Change the fan output in the config file to ‘out6’.

Firmware Configuration - Klipper
To control the CPAP fan through your Raspberry Pi you will first have to install the Klipper MCU on it. Click here to install and go through the setup.
For the pin name, you have to call the name of the MCU and then the number of the GPIO pin that the CPAP fan is connected to.

Connecting To Mellow Super 8 Board
If you happen to be connecting a CPAP fan directly to a Mellow Super 8 board, then here’s a little bonus for you.
This link will walk you through how to setup and configure your fan.
3D Printing Guides


Trending Articles


Latest Articles


Explore our 3D Printing Cost Calculator to effortlessly estimate your project costs. This tool helps you calculate material, power, and additional expenses, ensuring accurate pricing for every print.